uMark Video Watermarker is an easy to use batch video watermark software for Windows. The watermark process with uMark consists of three steps
1. Selecting the videos to watermark
2. Adding the watermarks
3. Saving the watermarked videos
1. Selecting the videos to watermark

The first step is to select the videos which you want to watermark. You can click on the Add Videos button to select the videos you want to watermark. You can also select the option from File > Add Videos menu option.
You can select multiple videos in the Pro mode. The selected videos will be added to the list of videos to be watermarked. You can also drag and drop the videos from Windows Explorer onto uMark window and they will be added to the list.
You can remove videos from the list by selecting the videos and clicking on the Remove Selected button. You can remove all videos by clicking on the Remove All button. The same options are also available under the File menu.
Selecting a video in the list will load up a single frame of the video in the preview are in the center of main uMark window.
2. Adding the watermarks
You can add two types of watermarks – text watermark and image watermark.
 Text watermark
A text watermark is a text only watermark that will be added on top of the video. This could be your name, copyright details or website URL or any custom text that you want as watermark.
You can add a new text watermark by clicking on the Add Text Watermark button or by selecting the Watermarks > Add Text Watermark menu item.
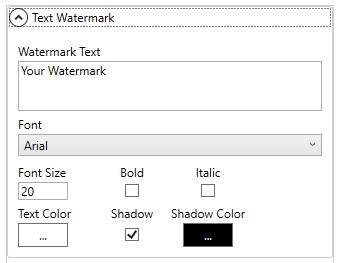
When you add a new text watermark, it will added with default text of Your Watermark which you can change in the watermark settings below the list of watermarks. You can change the text to anything that you wish. You can choose the font to be used for the watermark and set the size. You can specify if the text should be bold and/or italic.

You can specify the color of the text by clicking on the Text Color button. You can decide whether to include a shadow with the watermark. You can also specify a shadow color by clicking on the Shadow Color button.
Image Watermark
Image watermark is an image or a logo that you may add as a watermark on your videos. To add an image watermark click on the Add Image Watermark button or choose Watermarks > Add Image Watermark menu option.
When you choose the image watermark option, you will be asked to select the image that is to be used as a watermark. You can choose the image and it will be added to the list of watermarks.
Watermark positioning

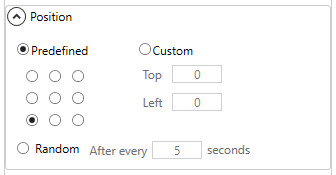
For both the types of watermarks you can choose the positioning of the watermark. You can choose to place the watermark one of the 9 predefined locations on the video or you can specify exact left and top coordinates in pixels to put the watermark there.
You can also choose to place the watermark at a random location on the video and have that position change after every X seconds.
Watermark transparency

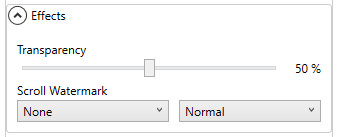
You can control the transparency of the watermark. You can drag the transparency slider to change the opacity of the watermark.
You can preview the changes you make to the watermarks in real time in the preview are in the center of the window. You can select a video from the videos list and the preview will be changed to one frame from the selected video.
Scrolling watermark
You can have the watermark scroll across the video in one of the four directions. - Left to right, right to left, top to bottom or bottom to top. A horizontally scrolling watermark (L-R or R-L) will appear at the vertical position chosen in the positioning section and a vertically scrolling watermark (T-B or B-T) will appear the horizontal position selected in the positioning section. You can set the scroll speed to either slow, normal or fast.
Saving watermarks for repeat use
uMark Video Watermarker lets you save the watermark settings for repeat use later so that you don’t have to recreate the watermarks every time. Once you have created your watermarks you can click on the Save Watermark button below the watermark list. You will be asked to provide a name for the watermark and it will be saved.
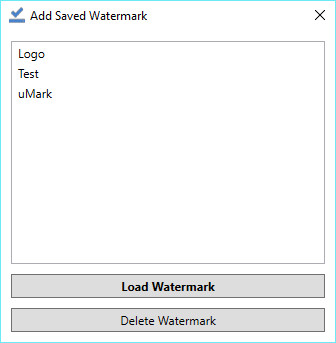
To use a previously saved watermark, click on the Add Saved Watermark button and you will get a list of all the saved watermarks. You can select a watermark from the list and click on the Load button and it will be added to the list of watermarks to be applied. If you wish to delete a saved watermark setting then you can select the setting and click on Delete Watermark button.

You can add multiple watermarks in the Pro mode and up to 2 watermarks in the Free mode. If you want to remove a watermark from the list of watermarks, select the watermark and click on the Remove Watermark button.
3. Saving the watermarked videos
After you are done adding the watermarks, it’s time to process the videos. Click on the Start Watermarking button at bottom and you will see the Output Options window. You can specify various parameters of the output videos in this window.

The first thing you need to provide is a path to a folder where the watermarked videos will be saved. You can type or paste the path in the textbox or click on the browse button next to the textbox to select a folder. uMark will not overwrite your original videos but will save a copy in the selected folder.
You can use uMark Video Watermarker to batch convert videos from one format to another. By default the videos will be saved in the same format as the original input video, but if you wish to save the video in another format you can choose the format on the output options window. uMark supports saving the videos to MP4, MOV, AVI, WMV and FLV formats.
You can specify the constant video and audio bitrate for the output. If you are not sure what bitrate to use, you can have uMark set the bitrate automatically based on the original input video.
You have to be cautious while setting a constant bitrate. Since uMark is a batch video watermark software, these settings will apply to all videos in the batch and ay severally affect the quality of the output videos. In most cases it is best advised to leave the option to Auto.
You can choose to remove the audio from the videos while watermarking. If you wish to do so, just check the Remove Audio option and the watermarked video will have no audio.
If you want the output video to be of a specific file size, you can uncheck the Auo option for file size and specify a size in megabytes. If you set the file size manually then you can not specify the video bitrate as it will be calculated automatically. Similarly if you want to change the pixel resolution of the video you can uncheck the Auto resolution option and specify the desired width of the watermarked video in pixels. The height will be set automatically according to the aspect ratio of the video. For instance if you wish to scale a Full HD (1920 x 1080) video down to 640 x 360 video, you can set the width to 640 and the height will be set automatically.
As with bitrate, if you specify the size or resolution options, those settings will be applied to all videos in the batch.
If you want the chosen output options to be set as defaults so that you don’t have to specify them every time you can check the Set as default option.
After you are done setting all options, you can click on the
Start button to start the watermarking process.
When the watermarking process starts you can see the progress at the bottom of the uMark window. You can see which file is being watermarked right now and its completion percentage.

You can click on the Cancel button to stop the watermarking process anytime.
Once all the videos have been watermarked, you will see a message saying Done. uMark will open the folder you had specified in the output options and you will find your watermarked videos there.
